Drive Firmware Security - Overview
Hardware
Storage drives are one of the more complex components you can find in a standard personal computer, essentially small computers in their own right. As computers, they contain the typical fundamental components you would expect: a processor, volatile memory, and non-volatile storage. They even run their own form of operating system, typically a minimal Real Time Operating System (RTOS), sometimes derived from common RTOS implementations such as ThreadX. All storage drives also have some type of storage medium they’re built around, such as NAND flash for SSDs or magnetic disks for HDDs, and will have a bus, such as SATA or NVMe, to interface with an attached computer. This bus will use a standardised command set, such as ATA for SATA drives, allowing a computer to both read and write data to the drive and access various other drive functionality.
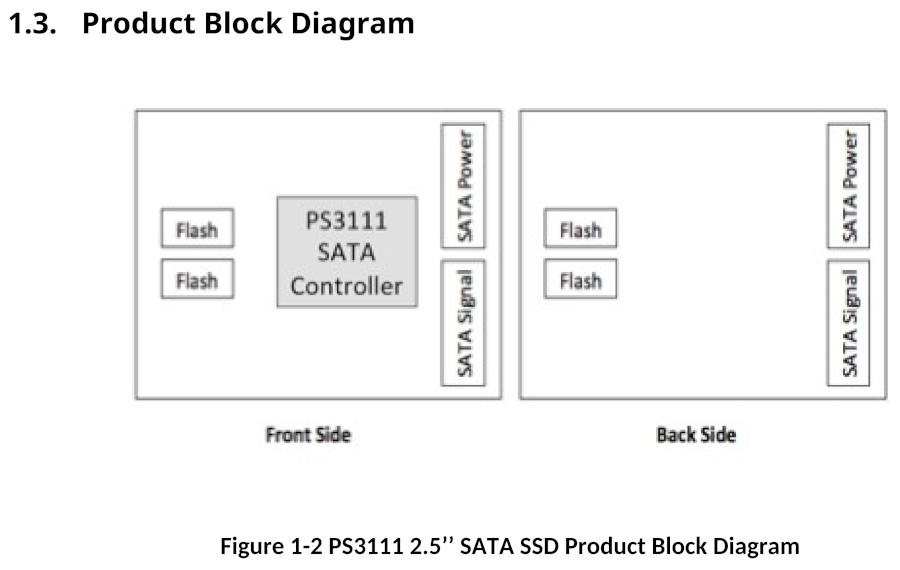
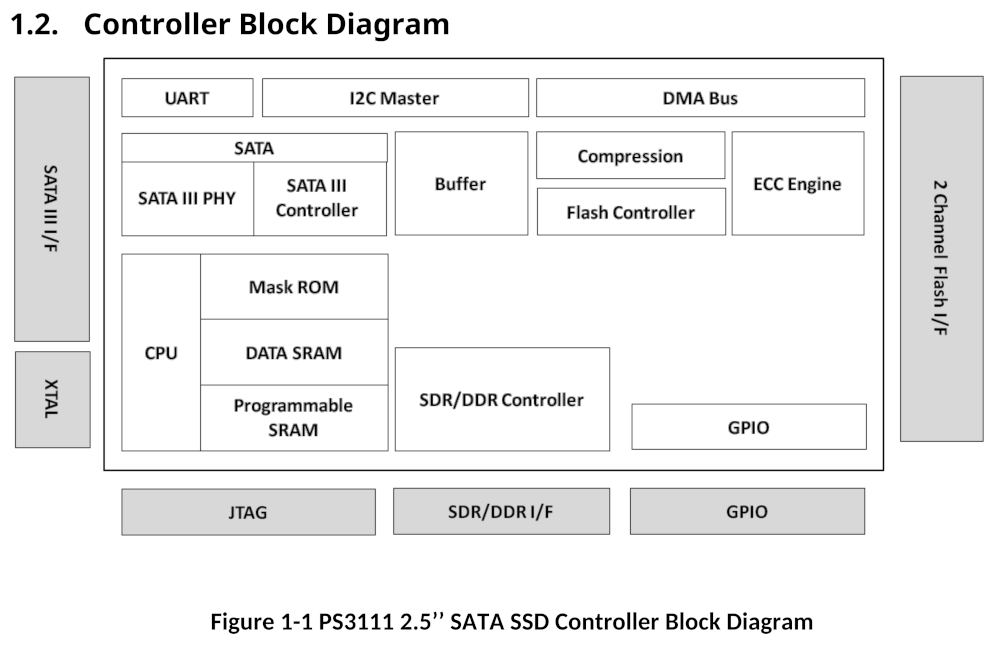
Example diagrams showing these components on a Phison S11 SATA SSD are included below: the first shows components on the PCB, and the second shows elements within the controller.
Boot Process
The Phison S11 is a simple design that is instructive for demonstrating the concepts SSD design is built on. When the drive is powered on, the CPU boots and executes code from a mask ROM internal to the controller. This initial code is a bootloader whose main task is loading and executing the main firmware code from attached flash chips. The bootloader searches by reading the first page of each block of connected flash to find a specific signature, and if found it will parse this page as a firmware header and load the firmware code in the pages that follow, executing it and handing over control. If the bootloader is unable to locate the main firmware on flash, it will instead fall back to its own minimal firmware implementation, commonly known as safe mode.
This safe mode is a version of firmware that implements only a very basic set of standard functionality, such as returning drive identification data, but without, for example, features to read or write data to storage. Most of the functionality available consists of undocumented vendor-specific features that allow software tools to load and execute firmware code in controller memory through the SATA interface, without the controller needing to load it from flash.
This ability for the bootloader to execute firmware in memory has two main purposes. The first is factory initialisation of the drive: when the drive PCB has been assembled but before the firmware has been installed, the drive executes a special manufacturing firmware variant in memory, which has functionality to initialise the drive and install the main standard firmware to flash. The second is drive diagnostics or recovery: if firmware on flash becomes corrupted or otherwise unavailable, firmware code can then be loaded into memory to investigate the drive further. This is commonly used, for example, during data recovery or the RMA process.
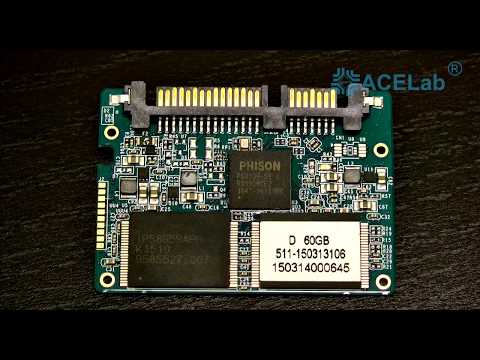
Although safe mode can be entered automatically on drive failure as detailed above, drives will usually also provide some hardware feature allowing it to be entered manually on demand, typically a jumper on the PCB. The video below shows safe mode in use with the PC3000 data recovery product, using it to diagnose and recover data from a malfunctioning drive.
Logical-to-Physical Translation
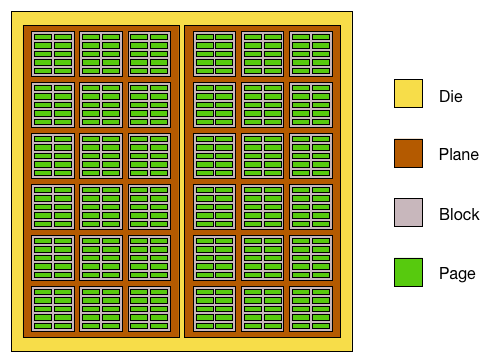
At the lowest level, a drive accesses its storage medium through a system of physical addressing, reading and writing data by its physical location. For SSDs, this physical addressing system is standardised to use values of the die, plane, block, and page within a flash chip. For HDDs, it uses values of Cylinder, Head, and Sector (CHS) for a position on the magnetic disks.
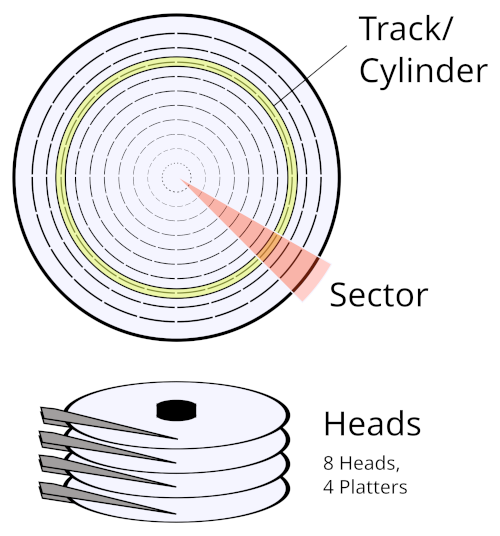
However, when a computer reads and writes data to the drive, it doesn’t use a physical location but a Logical Block Address (LBA). Rather than an array of physical flash chips or platters, a drive presents its storage to a computer as a single continuous area of data, indexed by a sector offset within that data. Once the main firmware has been loaded by the bootloader and begins executing, it must then set up the subsystem handling access based on that logical addressing, converting those LBAs to physical locations on the storage medium. This subsystem is commonly called the Flash Translation Layer (FTL) for SSDs, or the Translator for hard drives.
For conventional (non-Shingled Magnetic Recording) hard drives, logical-to-physical translation is fairly straightforward: each logical location is mapped directly to some physical location on a platter, a mapping that normally remains constant. A logical location will normally only have its physical mapping changed if a defect, commonly known as a bad sector, develops. This dynamic remapping of bad sectors is managed through a Grown Defect List (G-List), which is used in addition to the Primary Defect List (P-List) that remaps defects detected during the manufacturing process.
For SSDs, the logical-to-physical (L2P) translation is more complex, as the program unit and erase unit for flash aren’t the same: flash is programmed in units of pages but can only be erased for reprogramming as entire blocks. Because a page can’t be overwritten in place, rewriting a logical sector means writing its data to a new physical page and updating the mapping to match, resulting in a logical-to-physical mapping that is constantly changing as data is written.
This logical-to-physical translation data for both SSDs and HDDs is itself generally stored within the storage medium it’s translating: within the flash chips for SSDs, or the platters for HDDs. This raises a chicken-and-egg problem, though: if translation data is needed to properly access the storage medium, and that data is itself stored on the medium, how is the translation data first accessed when the drive powers up?
This is solved by bootstrapping logical access, reading some of the necessary initial data by physical location on the medium. For hard drives, this generally works by having a small additional serial flash storage area, which contains the minimal data needed to locate the main translation data by physical CHS location on the platters, with multiple redundant copies stored. For SSDs, this can work by scanning a range of blocks across accessible flash chips to search for a specific signature that identifies the necessary bootstrap data. The Phison S11 controller, for example, uses 32-bit magic values stored in the Out-Of-Band (OOB) spare area of each page, such as 0x31113111, used as the signature for a firmware header.
System Area
This design of internal translation data being stored within the drive’s main storage medium introduces the System Area (SA). For any storage drive, the data it stores is divided into two types: User Area data, which is all regular external data written to it as storage, and SA data, which is all other data used internally by the firmware. Although the SA is always at least partially designated by physical locations on the storage medium for critical data such as the L2P table, as detailed earlier, many drives also maintain a form of logical translation for SA data. Hard drives often have separate defect remapping specifically for the SA in addition to the standard P-List and G-List, and on Western Digital HDDs this is called the SA-List. For the Phison S11 SSD controller, critical SA data is all located by physical address based on page spare area magic signatures. However, some non-critical SA data, such as SMART logs, is stored within a separate logically addressed SA managed by the FTL.
Command Sets
When a drive is attached to a computer, the computer communicates with it through a standard command set, such as ATA for SATA drives and NVM for NVMe drives. These commands can have various functionality, not only reading and writing data but also configuring drive parameters or accessing diagnostics. Command sets do not map one-to-one to a drive bus type, as some command sets can be used for multiple: SCSI, for example, is used for both SAS and USB drives. This is further complicated by the fact that some command sets can be encapsulated within others, such as SCSI ATA Translation (SAT), which allows sending ATA commands through SCSI commands. This is commonly used, for example, with USB-SATA adaptors, where ATA commands can be sent to the drive through SAT over the USB Attached SCSI (UAS) protocol.
Command Sets - ATA
ATA is the command set of the SATA protocol, as used by most hard drives and many solid-state drives. The modern ATA command set defines commands using a set of fields, also known as registers, with some having variable size depending on whether the command uses 28-bit or 48-bit addressing:
| Name | Bits LBA-28 | Bits LBA-48 |
|---|---|---|
| Feature | 8 | 16 |
| Count | 8 | 16 |
| LBA | 28 | 48 |
| Device | 8 | 8 |
| Command | 8 | 8 |
Older ATA command set specifications used a different variation of fields, with some differences such as the LBA field being split. This variation is still often found today, especially in older resources:
| Name | Bits LBA-28 | Bits LBA-48 |
|---|---|---|
| Features | 8 | 16 |
| Sector Count | 8 | 16 |
| LBA Low | 8 | 16 |
| LBA Mid | 8 | 16 |
| LBA High | 8 | 16 |
| Device | 8 | 8 |
| Command | 8 | 8 |
The command register is used for the actual command opcode, ranging from 0x0 to 0xFF, while the other registers are parameter values with behaviours depending on the specific command.
ATA commands
| Opcode | Name |
|---|---|
0x0 |
NOP |
0x6 |
DATA SET MANAGEMENT |
0x7 |
DATA SET MANAGEMENT XL |
0xB |
REQUEST SENSE DATA EXT |
0x12 |
GET PHYSICAL ELEMENT STATUS |
0x20 |
READ SECTOR(S) |
0x24 |
READ SECTOR(S) EXT |
0x25 |
READ DMA EXT |
0x2A |
READ STREAM DMA EXT |
0x2B |
READ STREAM EXT |
0x2F |
READ LOG EXT |
0x30 |
WRITE SECTOR(S) |
0x34 |
WRITE SECTOR(S) EXT |
0x35 |
WRITE DMA EXT |
0x3A |
WRITE STREAM DMA EXT |
0x3B |
WRITE STREAM EXT |
0x3D |
WRITE DMA FUA EXT |
0x3F |
WRITE LOG EXT |
0x40 |
READ VERIFY SECTOR(S) |
0x42 |
READ VERIFY SECTOR(S) EXT |
0x44 |
ZERO EXT |
0x45 |
WRITE UNCORRECTABLE EXT |
0x47 |
READ LOG DMA EXT |
0x4A |
ZAC Management In |
0x51 |
CONFIGURE STREAM |
0x57 |
WRITE LOG DMA EXT |
0x5B |
TRUSTED NON-DATA |
0x5C |
TRUSTED RECEIVE |
0x5D |
TRUSTED RECEIVE DMA |
0x5E |
TRUSTED SEND |
0x5F |
TRUSTED SEND DMA |
0x60 |
READ FPDMA QUEUED |
0x61 |
WRITE FPDMA QUEUED |
0x63 |
NCQ NON-DATA |
0x64 |
SEND FPDMA QUEUED |
0x65 |
RECEIVE FPDMA QUEUED |
0x77 |
SET DATE & TIME EXT |
0x78 |
ACCESSIBLE MAX ADDRESS CONFIGURATION |
0x7C |
REMOVE ELEMENT AND TRUNCATE |
0x90 |
EXECUTE DEVICE DIAGNOSTIC |
0x92 |
DOWNLOAD MICROCODE |
0x93 |
DOWNLOAD MICROCODE DMA |
0x9F |
ZAC Management Out |
0xB0 |
SMART |
0xB2 |
SET SECTOR CONFIGURATION EXT |
0xB4 |
Sanitize Device |
0xC8 |
READ DMA |
0xCA |
WRITE DMA |
0xE0 |
STANDBY IMMEDIATE |
0xE1 |
IDLE IMMEDIATE |
0xE2 |
STANDBY |
0xE3 |
IDLE |
0xE4 |
READ BUFFER |
0xE5 |
CHECK POWER MODE |
0xE6 |
SLEEP |
0xE7 |
FLUSH CACHE |
0xE8 |
WRITE BUFFER |
0xE9 |
READ BUFFER DMA |
0xEA |
FLUSH CACHE EXT |
0xEB |
WRITE BUFFER DMA |
0xEC |
IDENTIFY DEVICE |
0xEF |
SET FEATURES |
0xF1 |
SECURITY SET PASSWORD |
0xF2 |
SECURITY UNLOCK |
0xF3 |
SECURITY ERASE PREPARE |
0xF4 |
SECURITY ERASE UNIT |
0xF5 |
SECURITY FREEZE LOCK |
0xF6 |
SECURITY DISABLE PASSWORD |
Command Sets - NVM
NVM is the primary command set for the NVMe protocol, as used by most modern SSDs. Commands are 64 bytes in size. Although the exact fields within those 64 bytes vary based on the command, there is a Common Command Format defining a general format applicable to all:
| Bytes | Field | Description |
|---|---|---|
| 0-3 | CDW0 | Command Dword 0 (Opcode, FUSE, PSDT, CID) |
| 4-7 | NSID | Namespace Identifier |
| 8-11 | CDW2 | Command-specific |
| 12-15 | CDW3 | Command-specific |
| 16-23 | MPTR | Metadata Pointer |
| 24-39 | DPTR | Data Pointer |
| 40-43 | CDW10 | Command-specific |
| 44-47 | CDW11 | Command-specific |
| 48-51 | CDW12 | Command-specific |
| 52-55 | CDW13 | Command-specific |
| 56-59 | CDW14 | Command-specific |
| 60-63 | CDW15 | Command-specific |
NVM commands are separated into two main types: I/O commands and Admin commands. I/O commands are what you would expect from the name, handling regular data reading and writing. Admin commands are the more interesting type for this topic’s security focus, as they handle management of the drive itself, including drive configuration, firmware, and various other internal functionality. NVM Admin command opcodes are organised into three ranges:
| Range | Purpose |
|---|---|
0x00-0x7F |
Standard |
0x80-0xBF |
I/O Command Set Specific |
0xC0-0xFF |
Vendor Specific |
NVM Admin commands
| Opcode | Command Name |
|---|---|
0x0 |
Delete I/O Submission Queue |
0x1 |
Create I/O Submission Queue |
0x2 |
Get Log Page |
0x4 |
Delete I/O Completion Queue |
0x5 |
Create I/O Completion Queue |
0x6 |
Identify |
0x8 |
Abort |
0x9 |
Set Features |
0xA |
Get Features |
0xC |
Asynchronous Event Request |
0xD |
Namespace Management |
0x10 |
Firmware Commit |
0x11 |
Firmware Image Download |
0x14 |
Device Self-Test |
0x15 |
Namespace Attachment |
0x18 |
Keep Alive |
0x19 |
Directive Send |
0x1A |
Directive Receive |
0x1C |
Virtualization Management |
0x1D |
NVMe-MI Send |
0x1E |
NVMe-MI Receive |
0x20 |
Capacity Management |
0x24 |
Lockdown |
0x7C |
Doorbell Buffer Config |
0x7F |
Fabrics Commands |
0x80 |
Format NVM |
0x81 |
Security Send |
0x82 |
Security Receive |
0x84 |
Sanitize |
0x86 |
Get LBA Status |
0xC0-0xFF |
Vendor Specific |
Command Sets - Vendor Unique Commands
As mentioned in the Boot Process section, in safe mode software tools can use vendor-specific features to load firmware into memory. These features are implemented as Vendor Unique Commands (VUCs), also known as Vendor Specific Commands (VSCs). In any command set used by drives, some subset of commands is reserved as vendor specific, and these commands are available for drive vendors to use for whatever functionality they like. Some forms of VUCs can be more complicated: instead of using those reserved command codes, they implement special features within the standard command set, such as magic parameters to activate some alternate functionality. Others use sub-protocols transported within the standard command set, such as ATA SMART Command Transport (SCT).
VUCs are not something unique to a drive’s safe mode, but something vendors also implement in standard firmware versions, providing commands available during normal drive operation. These commands can allow access to low-level engineering features and firmware internals, including reading and writing controller memory, accessing physical flash directly, and configuring internal drive parameters. VUCs are usually undocumented and intended for internal use by the vendor. However, through leaked information or reverse engineering, they can sometimes be discovered and used. All modern storage drives implement some form of VUCs, across all drive types including SATA and NVMe, as vendors consider them an essential tool for drive manufacturing and diagnostics.
Security
Over the years, drive manufacturers have introduced many security features to protect their products. These features cover firmware confidentiality and integrity, and control over authorised access to Vendor Unique Commands.
Modern storage drives generally secure their firmware with encryption, and often with cryptographic signing too for validating authenticity. Firmware is usually secured with these protections not only through the standard update process (e.g. firmware sent through the ATA DOWNLOAD MICROCODE command), but also at rest when stored in the drive. When the bootloader loads firmware as detailed in the Boot Process section, it will first decrypt the firmware and verify some type of signature or checksum before executing it, providing protection intended to be analogous to UEFI Secure Boot found in personal computers.
VUCs for accessing sensitive drive functionality will also generally be locked by default during normal drive operation, and drive firmware will usually implement some type of authentication flow to gain access to these commands. This authentication is usually implemented as a challenge-response scheme: some subset of unrestricted VUCs is first used to read challenge data from the drive, which the tool then uses to compute a response sent back to the drive, and the restricted VUCs are unlocked only if the drive validates that response. Depending on the design, this can use symmetric cryptography, where the drive and tool share a secret key, or asymmetric cryptography, where the tool signs the challenge with a private key that the drive verifies against a stored public key.
Both types of security protection detailed above are often built on asymmetric cryptography using an algorithm such as RSA. The drive will contain a public key to verify the signature of firmware images or VUC unlock challenge responses. However, the private key necessary to create those signatures is not contained in the drive at all and is retained by the vendor for their internal use.